Main purpose heating system– space heating and maintenance comfortable temperature during heating season(autumn - winter - spring). A comfortable temperature is considered to be in the range from 18 to 25 ° C. Heating appliances must compensate for heat loss through individual structures buildings: floors, external walls, windows, doors, openings, technical communications, etc.
The scheme for connecting heating radiators in a private house should be selected when designing the building itself before construction work. However, the improvement of the heating system is also possible during the use of premises for living or other purposes.
If central heating is available in the locality, then the best option is connected to a common heating main.
In the event that there is no centralized heating or, for some reason, dependence on a heating plant is impossible, then options should be considered offline circuit for the heating system.
Heating efficiency factors
- Wiring heating network . How correctly it is done depends on how efficiently and evenly the rooms will be heated, and, consequently, the price for heating;
- Selection of equipment and materials based on the correct calculation of technical and economic indicators.
Right choice equipment will lead to maximum heat transfer. At the same time, fuel consumption for heating should be minimal; - Installation main pipelines, heating appliances, shut-off and control valves, as well as boiler and pumping equipment.
Incorrect installation of any of the elements of the heating system can lead to failure of the entire network; - preliminary calculations and determination of the scheme of the heating system of the building, as well as the choice of equipment, materials, components, themselves installation work require some experience and special knowledge;
- The involvement of professionals in such work may increase the cost of installing heating, however, in the absence of confidence in independent calculations and work, it's not worth saving on this.
Schema selection
After choosing the type heating appliances the scheme for connecting the heating radiator to the system in the building will be determined. All existing connection schemes are divided into single-pipe and two-pipe.
Pipelines to radiators can be of three types:
- lower;
- lateral;
- bilateral.

Important!
When planning one-sided piping, it is not recommended to install more than twelve sections for gravity networks and 24 for networks with a circulation pump on one heating radiator.
For installation more sections, it is necessary to apply versatile piping to heating appliances.
With your own hands, it is necessary to take into account the throughput of pipelines, which is associated with the diameter and roughness coefficient.
To achieve the greatest heat transfer, optimal placement of radiators in the room is required, namely, observing the installation distance from the wall.
The installation instructions for heating radiators prescribe the following standards:
- The radiator should be installed at a distance of 10 - 12 cm from the floor;
- The distance from the window sill to the battery should be at least 8 - 10 cm;
- The rear panel of the radiator must be at least 2 cm from the wall;

- with your own hands, it is necessary to provide for the regulation of the heating of these elements, both in manual mode and in automatic mode. For this purpose, special thermostats are provided;
- Manual taps, latches and valves will allow you to quickly turn off the heating radiator in case of emergency. During repair or maintenance, this will allow you to turn off each heater, regardless of the entire system;
Important!
With a single-pipe version of the installation of valves, it is necessary to supplement the system with jumpers between the two pipes. Without such jumpers, the installation of valves does not make sense.
- Mayevsky cranes should be installed on radiators. With the help of these elements, air is bled from the network. This is carried out at the beginning of the season, as well as when air locks in pipes or radiators.
Mounting sequence
Mounted in the following order:
- Preliminary marking is carried out for the installation of brackets;
- Brackets are attached to the wall;
- Mayevsky cranes are mounted on radiators;
- Plugs, taps, valves and regulators are installed;
- The radiator is placed on brackets aligned with horizontal level;
- With the help of transitional cuts, the radiator is connected to the pipeline;
- Pressure testing and test run of water is carried out.
As for the binding steel radiators, then the connection diagram for steel heating radiators with a lower connection differs from the usual one - from the side. It is, in principle, simpler than the usual wiring diagram.
Advantages
- Significant increase in heat transfer;
- Increased heat transfer due to convection;
- Reducing the inertia of the heating system.


Steel tubular radiators
The connection of such heaters is carried out similarly to the connection of sectional batteries. Applies diagonal pattern, and with an increase in the number of sections, the radiator is connected from the side or from below.
Pipes are just installed simultaneously with gas boilers.
It depends on how the scheme for connecting heating batteries in a private house will then be arranged.
It is better to get acquainted with the current ones before making a choice in favor of certain devices. This will help to spend as little time and effort as possible on arranging a working system:
- Minimum 2 cm distance between wall and back walls on the panels.
- 8-10 centimeters should be equal to the gap, starting from the top of the radiator, and ending with the window sill.
- 10-12 centimeters - the minimum distance from the bottom of the battery to the floor.
In devices, heat transfer becomes less if these standards are not observed. Reduces the likelihood that the operation will be uninterrupted. And the very scheme for connecting heating batteries in a private house from a gas boiler ceases to be effective.
Radiators must have an adjustment function. It is automatic, either. Therefore, the kits are supplied with heat regulators. Thanks to which indoors it is easier to maintain optimal level by temperature.
What is piping
When connecting, use two-pipe or one-pipe schemes.
Single pipe option
In addition, heating is not complete without such additional elements.
- Temperature controller. It helps to save fuel, maintain the temperature in the rooms at the same level.
- Air vents. Needed to release oxygen. It periodically accumulates in the pipes, because of which it becomes a destructive element.
- Stop valve. Maintenance with repair is easier for those systems that have a large number of cranes installed.
Expansion tanks - irreplaceable assistants when building systems of any type. It is released in closed and open.
Paired with circulation pumps put only closed varieties. open tanks trying to place as high as possible. For example, in the house attic.
What about chimneys
And in this case there is mandatory conditions. The outlet pipe at the boiler must exactly match the diameter. There are other subtleties:
- If the pipe fits unheated room, in these places, insulation is required.
- It is unacceptable to have connections in places where pipes pass through roofs or walls.
- Three bends maximum amount for the chimney from the boiler to the head.
Installation of heating batteries: main stages
The installation rules remain the same for each type of battery. It doesn't matter which one played the role of the main one, how the connections are made. The order of operations will always look like this.
- First, they shut off the entire heating system, drain the water.
- The battery is dismantled along with other elements of the old circuit.
- The use of dowels for marking and fixing brackets on wall surface. A cement solution is needed for rubbing places with fasteners in order to level the surface.
- After that, the plugs begin to be installed. There are entrance holes for each pipe, on both sides. Plugs for the organization of the passage, on which the correct thread is applied, are wound in places where the connections are located. Linen strips with additional sealing adds tightness to the whole structure. At the top there is a valve mechanism that releases excess air.
- Radiators are hung on supports prepared in advance. Water special devices will help to check how correctly the levels are set.
- Installation stopcock inside the passageways.
- Batteries are connected to the pipeline.
- The entire heating network is tested.
Do not get carried away with decorative protective screens. They look but right moment can block access to thermostats. Because of this, the heating is turned off in case of insufficient heating.
For more information about the heating system at home, you can watch the video:
Noticed an error? Select it and click Ctrl+Enter to let us know.
Faced with the need to replace or install radiators, you should know that there are several options for connecting them, each of which has certain features. It is also worth studying the principle of their installation in order to ensure correct work equipment.
Types of heating systems
At single pipe system heating of radiators is uneven
Selecting a connection scheme

The uniformity of their heating depends on the choice of the radiator connection scheme.
To figure out how to properly connect heating radiators in a particular case, you need to study the video instructions, as well as consider all possible schemes installation. Each of them is in demand under certain circumstances and has a number of advantages and disadvantages:

Radiator connection diagrams
This video discusses and clearly shows the connection diagrams for heating radiators. You will see the distribution of the coolant in each of the presented connection schemes, and you will also be able to objectively evaluate their advantages and disadvantages. What is important: in the video material, a method is available, how to increase the heat transfer of the radiator by 20% with a valve.
Installation of radiators

Connection to the branch pipes must be carried out using tow
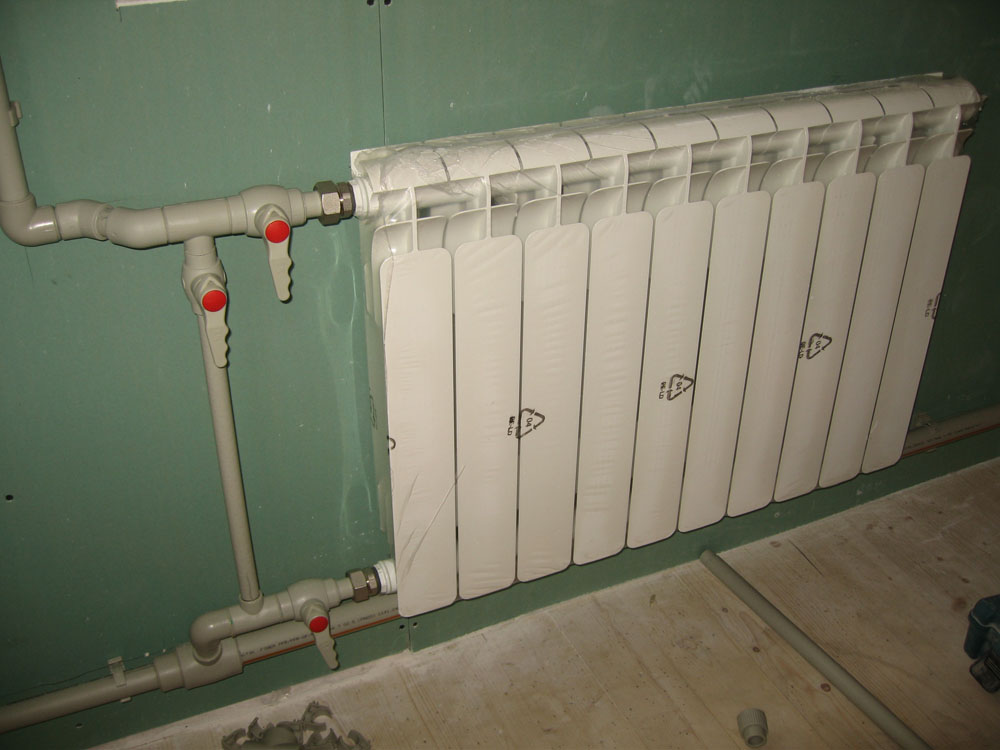
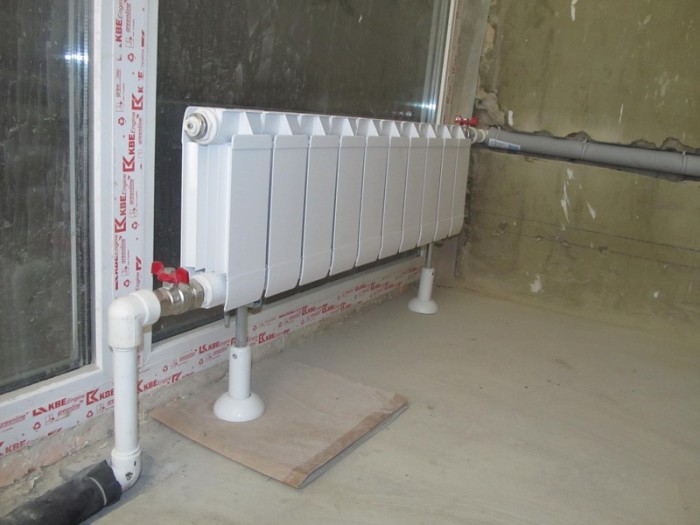
First of all, you need to determine the place for the radiator. Typically, installation is carried out under the windowsill, since the window is the main source of heat loss. To ensure normal air circulation, the radiator should be placed at some distance from the wall (about 2 cm), and from the floor and window sill - 10-15 cm.
It is required to install a radiator with a slight slope relative to the horizon, so that air is collected at its highest point, which must be released using a Mayevsky crane. It screws into the top radiator hose. Pipes are connected to two holes according to the selected scheme, and a plug is inserted into the last pipe.
Specialists in the installation of radiators note that the most optimal scheme for connection - diagonal. In rare cases, several sections may remain cool if there is not enough pressure or bandwidth. Lateral one-way connection - least effective method, because hot water enters at the top and does not go through all sections, but moves along the path of least resistance. Therefore, sections located farther from the connection point will not warm up.
The bottom and saddle connection is gaining more and more popularity, since the heating of the sections occurs fairly evenly. And also the choice of this scheme allows you to hide pipes in the wall.
Experts advise paying attention to the material of the radiator. So, for cast iron and steel, they advise bottom connection, for aluminum and bimetallic - bottom or diagonal.