The idea of producing material for paths and playgrounds at home is very promising. For a private house and for a summer residence, this is always a hot topic, so it is possible that it will become your source of income. The manufacturing technology of paving slabs at home differs from the factory one primarily in scale.
Production of paving slabs at home
Any owner of a private house, one way or another, faced with the manufacture of concrete and is familiar with cement firsthand. In this case, making paving slabs with your own hands will not seem like something completely new. At home, vibration casting technology is most often used. The concrete mixture is poured into molds and compacted on a special vibrating table. Such production involves the use of plasticizers as part of the pouring solution.
Equipment
For home production, a simplified set of tools and equipment is used. You will need:
- Vibrating table for concrete compaction;
- Forms;
- Rubber mallet;
- Master OK;
- Concrete mixer;
- Auxiliary items: buckets, shovels, etc.

Craftsmen tend to build vibration tables on their own, since there are plenty of schemes on the Internet.

Consumables
To prepare a concrete mortar for tiles, the following materials are needed:
- High-quality cement from 400 brands, the best option is M500;
- River sand, which must first be sifted;
- Crushed stone (gravel or screenings) with a diameter of not more than 10 mm;
- Plasticizers and other improvers;
- Pigments (for colored tiles);
- Clean water from the tap;
- Special lubricants for moulds.

Step by step description of home production
Form preparation
Before pouring the solution into the molds, they must be properly prepared, otherwise further stripping and cleaning will be extremely difficult. To do this, the molds are covered from the inside with a thin layer of special lubricant. At this step, the main thing is not to overdo it with the thickness of the layer, otherwise you can get products damaged by bubbles.

Petroleum products are not suitable for mold lubrication.
To facilitate the process, aerosol lubricants are sold that are convenient for use at home.
Mortar recipe
The secret of the quality of tiles lies in knowing the correct recipe for the preparation of the mixture, as well as in observing the technology of its production. Properly selected ratio of components will give a strong and durable tile. Colored tiles require the introduction of dyes, but they reduce the strength of the finished product. Strengthen the strength will help the addition of reinforcing fibers.

Plasticizers are used to improve the quality of concrete, namely its plasticity, which is important when pouring. Its amount should not exceed 0.5% by weight of all other dry ingredients. Pigment additives are introduced in an amount of 2% of the total dry mass, having previously been dissolved in water until completely homogeneous. The recipe for mortar for pouring molds at home assumes a ratio of cement to sand at a rate of 1: 3.
An equally important point in production is the amount of water that determines the consistency of the solution ready for pouring. Excessive water will damage the strength of the paving slabs. Usually take 2 buckets of water for 3 buckets of cement.
Preparatory work
Before you start kneading, take care not to delay the introduction of the components during kneading. It is best to do the work with a helper who will promptly deliver the necessary ingredients.
On buckets, you immediately need to make notes on sand, gravel and cement for one batch. Plasticizers and dyes are pre-dissolved in hot water. Along the way, such work cannot be done, because there should be no lumps and precipitation left in them.
batch
Mixing the solution requires the correct order of introduction of the components with constant stirring. For a one-time batch, a conventional puncher with a mixer nozzle is suitable, but for large volumes of production, a small concrete mixer is indispensable.

Kneading instructions:
- First in order, water is poured into the mixer, minus the one in which plasticizers and dyes are diluted, because it is also a liquid;
- The second component is smoothly introduced cement with continuous operation of the concrete mixer;
- In turn, sand and crushed stone are introduced into the solution;
- When a plastic mass is obtained, plasticizers and pigments dissolved in water are added;
- Stirring is carried out for a few more minutes until a homogeneous porridge-like mass is obtained.
The consistency of the solution should be plastic, but not too liquid. The portion taken should hold well, not flow or break into pieces.
Pouring and vibrating table
By and large, at home, you can do without a vibrating table, but in this case you will not be able to get high-quality products. The fact is that even a very plastic mass is not able to tightly fill the forms and voids cannot be avoided. For home tracks, this will do, but for sale you need products of a higher class.

The casting molds are installed on a vibrating table and filled with a solution to a height of not more than 4 cm. In the production of colored tiles, two compositions are often prepared: colored and regular. Fill the forms in layers, which allows you to get a more durable tile. In some cases, the tile is reinforced not with crushed stone, but with a metal mesh laid between concrete layers.
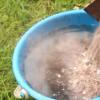
The work of the vibrating table is started, which will compact the mass in about 5 minutes. Understanding the readiness and absence of voids inside the mass gives the appearance of white foam on the surface of the concrete mixture.
solidification
After the forms are qualitatively filled on the vibrating table, they are removed and moved to special racks. Exposure should take place for about 2 days without access to direct sunlight. In no case should the concrete dry out prematurely, so in the heat it must be periodically moistened by spraying water.

Stripping
The last step for the production of paving slabs is stripping, which is done 2-3 days after pouring. It must be carried out carefully, since the tile is damp and has not gained maximum strength. Using mold release agents beforehand makes this process easier, so don't skimp and skip this step. To obtain durable products, before demoulding, you need to lower the molds into water with a temperature of 50 to 70 degrees. A few minutes of such warming up and you can get the tile, having previously tapped the molds with a rubber mallet. Warming up the molds significantly increases the number of production cycles. In addition, such a measure will help minimize marriage.

After stripping, the tiles still need to be cured for about 5-6 days. To do this, they are covered with a shrink film.
Now you know how to make paving slabs with your own hands and you can carry out this venture at home. If everything goes smoothly, then you can think about a small commercial project. It is realistic to start your own business, even without a special tool, purchasing it as your business develops.
Economical production of paving slabs (2 videos)
__________________________________________________

18093 0
Paths on a personal or garden plot, paved with paving slabs, are functional and aesthetic. Paving stone pavement is strong, durable, easy to maintain and attractive. But the cost of such a coating, when it comes to buying several tens of square meters of tiles, is significant. Therefore, craftsmen, in order to save money, using technologies available for home conditions, have been successfully making paving slabs with their own hands for several years.
The quality of paving slabs depends on compliance with the technology and the correct formulation.
Technology Choice
There are two ways to produce paving slabs:
- vibrocompression;
- vibrocasting.
The first method for the production of tiles at home is not suitable by definition - there is nothing to press with. And the manufacture of high-quality paving stones with your own hands by vibrocasting is quite real.
Manufacturers offer the following types of molds for the production of paving stones:
- polyurethane - allow up to 100 molding revolutions;
- from plastic - up to 250 revolutions;
- from plastic rubber - more than 500 cycles.
The price of products depends on the number of molding cycles, so the high cost of rubber and plastic molds implies their use in the production of large volumes of tiles, and polyurethane products are quite affordable for the average buyer. Having bought 5 molds, you can make 500 pieces of paving slabs with your own hands, and with careful handling it is possible to make more.

Tile molds
Forming templates for the production of paving stones
For casting paving slabs “in place”, template molds are used in the form of a frame made of partitions, resembling irregularly shaped honeycombs, which you can buy or make yourself. Having laid such a frame on a properly prepared base, the honeycombs are filled with concrete. After a few hours, the template is removed, and instead of honeycombs, ready-made flat concrete fragments remain on the base, between which only the joints need to be arranged.
In addition, if it is planned to lay paving stones, for example, on auxiliary paths of a garden plot, and the requirements for it are low, then molds for casting such tiles can be made by hand.

For the manufacture of paving stones, first of all, you need to stock up on special molds for casting.
Independent production of molds for casting
Paving slabs with their own hands.
The universal format of paving slabs is a square with a side of 30 cm. This size provides the necessary strength when working on bending and is convenient for cutting the product in half or into 4 parts when you need to adjust the material. Therefore, from smoothly planed wooden bars with a section of 60 x 30 mm, you need to make a frame with internal dimensions of 30 x 30 cm and a depth of 60 mm with your own hands. It is better to assemble the frame on self-tapping screws, which in the future, when removing the frozen product, it will be easy to unscrew and then return to its place.
To form a pattern on the front side of the future paving slab, an elastic base with a corrugated surface is chosen, for example, a rubber mat with a large pattern, and a form frame is laid on it.
Before forming the side of the frame and the figured base with a brush, smear with a thin layer of kitchen gel for washing dishes.
So that the process of making tiles with your own hands does not drag on for months or years, you need to make at least 10 forms.

Making paving slabs with your own hands is a rather laborious process.
As forms for paving slabs of small format, disposable plastic containers can be used for packaging various products, filling them with mortar to a fixed depth. The turnover of such "forms" is 5-10 cycles, but this is offset by the negligible cost of used boxes.
Manufacturing technology of paving slabs by vibrocasting
This method consists in pouring cement-based mortar into special shapes with simultaneous or subsequent compaction of the contents by vibration.
Vibrocasting can be produced using single-layer and two-layer technology.
single layer method
The single-layer technology consists in filling the molds with a solution, compacting on a vibrating table, followed by holding the products in the molds for two days and demoulding. The strength and aesthetics of such a tile is lower than that of a two-layer paving stone made by vibrocasting, therefore it is used for paving utility areas that do not require high aesthetics.

Making vibropressed paving slabs is easier than making vibrocast
Double-layer vibrocasting
With two-layer pouring, a solution with a coloring pigment layer of 1-2 cm is poured into the molds while vibrating. On top of the colored solution, without waiting for the setting of the front layer, flush with the edges of the forms, the composition of the main layer without dye is poured and vibrated for 15-30 seconds. After 2 days, the products are removed from the molds and stored for drying in a cool place.
Regardless of the number of layers, the forms filled with mortar are covered with a plastic film to prevent premature evaporation of moisture and partial loss of paving stone strength.
The purpose of the front layer is to increase the strength characteristics and aesthetics of paving slabs. This layer is a durable shell with a glossy surface, dyed in the selected color by adding a dye to the solution. If, instead of gray cement M500, white cement of the same brand is used, then the colored front layer can be made saturated, without a gray tint.

Do-it-yourself preparation of paving mortar is an economical option
Facing concrete components
To make the front layer durable, uniform and glossy, the following materials should be included in the composition of the solution:
- cement M500 (preferably white);
- crushed stone (granite, marble, gravel) fraction 5-10 mm;
- sifted sand in the ratio;
- water;
- color;
- dispersant.
Recipe of concrete for the formation of the front layer
When performing kneading on the front layer, the weight ratio of the amount of cement and SCHPS is 1:2.
Using the example of a specific operation, we will consider the procedure for mixing the solution of the front layer in a concrete mixer. 10 liters of water are poured into the mixer, into which, in the case of the production of colored paving stones, a dye is preliminarily added. Then 750 grams of an aqueous solution of a dispersant are poured into it, a concrete mixer is turned on and 3 buckets of SCHPS and Portland cement M500 are sequentially poured. After a minute of mixing, 3 more buckets of screenings are added to the concrete mixer.

Mixing concrete in a concrete mixer is carried out in a certain sequence
Mixing is carried out for 15-20 minutes until the solution acquires a homogeneous consistency of thick sour cream, after which the mass is transferred from the concrete mixer to the tub, and molding can be done.
The amount of color in the solution should be no more than 5% of the batch volume. The proportion used must be remembered in case you need to make an additional batch.
Formation of the front layer of the tile in the form
After lubricating the inner surface of the molds, the prepared solution is laid out in them with a layer of 1-2 cm and compacted by vibration. In the absence of a vibrating table, you can get by with the installation of molded products on a sheet of iron and tapping from below with a rubber mallet. Particularly savvy craftsmen use a washing machine to vibrate, on which forms are placed when the centrifuge is operating in the spin mode.

The main difference between paving stones and paving slabs lies in its shape.
Components of the base layer solution
In the formulation of the solution forming the main layer, the dispersant is replaced by a plasticizer. In the process of preparing the mortar, one part of the M500 brand cement is mixed with three parts of the crushed stone-sand mixture. The plasticizer is added in the same amount as the dispersant to the face layer.
How to mix concrete for pouring the base layer
Consider the technology for the production of a specific portion of the solution using a concrete mixer.
750 grams of an aqueous solution of a plasticizer are mixed in 12 liters of water, after which 5 buckets of SCHPS and 3 buckets of Portland cement M500 are sequentially poured into a working mixer with liquid, after which another 3-4 buckets of screenings are added. There is no need to color the main material of paving slabs. The concrete is mixed for about a quarter of an hour and, upon reaching the consistency of sour cream, is unloaded into a tub.
To knead concrete at home per 1 sq. paving stones 6 cm thick, you will need:
- Crushed stone-sand mixture - 90 kg;
- Cement M500 - 25 kg;
- Dispersant - 120 grams;
- Plasticizer - 100 grams;
- Dye - 600-800 grams.
Reinforcing paving stones and pouring the base layer
To increase the strength of the tile, you can do the reinforcement of the product with your own hands. As a reinforcement, a cut-to-size “notch” (expanded steel sheet) made of a steel sheet with a thickness of 1 or 2 mm is ideally suited. The cut pieces are laid on top of the mortar of the face layer of the tile and covered with concrete flush with the edges of the forms. Reinforcement of products at home can also be done using pieces of thick wire or smooth rolled reinforcement, steel mesh laid crosswise.
To ensure the solidity of the tile, the filling of the second layer is carried out no later than 20 minutes after the formation of the first.
After the mortar is compacted by vibration, the molds are placed on a horizontal surface in a cool place for two days until the concrete hardens.

Modern paving slabs are suitable for arranging urban or country yards
Stripping molds and removing tiles
If the form is made by hand from wooden bars, then the fixing screws are unscrewed in one of the joints, after which the frame is moved apart, and the product is released. Paving stones are given another 10 days to gain strength and dry, laying the tiles in one layer in a cool room.
If polyurethane molds were used for the production of tiles, then the mold with the product is placed in a bath of warm (60 degrees) water for a couple of minutes to soften the polymer, after which the tile is removed and also placed in a cool place for 10 days until final readiness for use.
Taking into account that the tile must be in the form for two days, it is possible, having 10 forms at its disposal, to extract 5 finished products daily and make 5 regular moldings.
Every owner who wants his property to look beautiful and be functional tries to do a lot with his own hands. Especially if he is a creative person. From this article you can learn how to make paving slabs with your own hands.
Where is the product used?
In principle, the scope of such material is quite wide. Most often, you can see such products in private areas of residential buildings, cottages, baths or other structures. You can also lay such tiles in gardens, squares, parks and other public places. Naturally, in the latter case, ready-made material is purchased.
Before you begin to understand how to make paving slabs with your own hands, you need to figure out whether it is worth doing it, what advantages the finished product has, what you need to prepare for work. First of all, it must be said that the manufacturing process is not complicated and does not require expensive equipment.
Material advantages

Before you make paving slabs with your own hands, you should consider its advantages. Among them are the following:
originality of elements. During the manufacturing process, you can play with colors and fillers. In this way, you will create exactly the design and shape of the tiles that you yourself want. Naturally, one should be careful here, because the technical characteristics of the product depend on the proportions of the ingredients.
Low cost. Naturally, before you make paving slabs with your own hands, you need to select the necessary materials, which must be of high quality. You should not "buy" for cheap cement.
Relative strength (although you should not lay these elements where the car will drive).
Manufacture of products directly at the installation site.
No need for expensive equipment. However, if you decide to open your own business, then you cannot do without a couple of machines.
Ecological purity.
Resistance to rapid wear and durability (if all manufacturing steps are performed correctly).
Minimum injury risk.
Now consider the question of how to make paving slabs with your own hands.
What materials will be required?
Naturally, all ingredients must be of the highest quality. So, for work you need to prepare:
1. Cement (only the M-500 brand is required, since this type of material allows you to make a mixture that, after hardening, will be very strong).
4. Small stones.
5. Kohler (one or more).
6. Plasticizer (sold in a hardware store).
All ingredients must be free of impurities (garbage, leaves, grass). Also, before you make paving slabs with your own hands, collect all the necessary materials and necessary tools.
Required Equipment

So, in order for the manufacturing process to go relatively quickly, you need to take care of all the technical devices in advance that will help speed up the work. So, you will need:
Concrete mixer. If there are several, that's good. In this case, the process will go faster.
Shaping vibrating table. You can also build it yourself. Although this machine is optional.
Form set. It is better if there are several dozen of them.
Tables or shelving that will be set as level as possible. Otherwise, the mixture in the molds may freeze incorrectly, with a skew. Naturally, such elements will already be considered defective, since they cannot be laid evenly.
Tool for pulling finished products out of containers.
Since almost everyone can do it, you should consider the technology of the work.
Features of the choice of form

This question is not difficult. Most often, plastic molds are used for home-made material presented. They may have different sizes. In addition, our construction market represents a huge selection of types of such forms. That is, you have the opportunity to make a very original tile that no one else will have. Naturally, such a container must be strong enough so that it can be used more than once.
Before you do it yourself, you need to decide on the shape of the containers: square, round or some other. If you do not want to buy such material in the store, then you can use ordinary plastic food containers. However, they won't last long.
Features of the preparation of the solution

Before you make paving slabs yourself, you should find out in what proportions you need to mix the ingredients so that later the elements turn out to be of high quality and durable. You will need the following amount of materials for one batch:
It must be mixed thoroughly. And in order for there to be no air in the solution, it will need to be processed on a vibrating table.
Manufacturing instructions
Now consider the question of, in fact, how to make paving slabs yourself. The whole process involves the implementation of several stages that cannot change their sequence:
1. Preparation of the solution. All ingredients must be mixed thoroughly. This can provide Although gravitational works no worse.
2. Filling molds, as well as vibratory compaction of the mixture. This should be done carefully. Filling is done with a conventional shovel. For compaction, you need a vibrating table. His vibrations should not be too strong. That is, make sure that the solution in the form is distributed evenly. Such a seal will make the elements as strong as possible and prevent their delamination. When loading concrete, consider its level. In all forms, it must be the same. To do this, you can simply make marks on the inside of the container.

3. Aging and drying of the elements. Since you want to make paving slabs at home quickly, many manufacturers may violate production technology. The quality of the elements suffers from this. Therefore, it is necessary to maintain the time that is allotted for the aging of concrete and its drying. So, after compaction, the molds with the mixture should “rest” on a flat surface for at least two days. In order for the maturation to go well, and the cement not to crack due to moisture loss, the containers should be well wrapped with plastic wrap.
4. Removal of finished products from molds. Now you understand how to make paving slabs at home, you also know the composition of the mixture. However, you should consider how to properly remove the finished elements from the molds so that they do not break or crack. To do this, it is better to place them in a bath of water, the temperature of which will be no more than 70 degrees.
5. Warehousing products. In order for the concrete to dry quietly further, it is necessary to cover the tile with a shrink film.
After all these steps, the product is almost ready for installation. Naturally, he should be given time to gain strength. It is best to leave the material alone for a few weeks. Now you understand how to make paving slabs at home.
What is a "plastic bottle tile"?

The problem of recycling is very relevant today. However, a way has been devised to use plastic bottles, which involves reducing the degree of environmental pollution. They learned how to make paving slabs from them. Moreover, this process can take place both at home and at work.
Before you make paving slabs from plastic bottles, you should consider the features of this procedure. Its advantage is the low cost of the product, as well as the absence of problems with the amount of raw materials.
The production of such material is divided into the following stages:
Grinding of raw materials.
Melting plastic in a special heating apparatus and mixing it with raw sand and pigment.
Pouring the resulting solution into molds and pressing.
Cooling tiles.
It should be noted that such a product is characterized by durability, high strength and resistance to abrasion, external beauty, a variety of shapes, and speed of production.
Making paving slabs with your own hands is not very difficult. However, the process has some nuances. For example, if you want to save a lot of color, you can use the layer-by-layer casting technique. Naturally, in this case, you will need two concrete mixers. Layers are stacked alternately, and colorless should be inside. The thickness of each is 1-2 cm.
If you have defective pieces of tile, then it can be broken and reused in the solution. New forms can be treated with a special substance so that later the concrete moves away from the walls better. After use, the plastic must be washed with a weak solution of hydrochloric acid. Forms for work can be made independently using silicone or wood. Naturally, these elements will need to be well fastened before work.
Please note that the plasticizer helps to increase the strength of the elements, as well as their resistance to temperature changes. However, don't add too much. For the manufacture of the presented building material, not only concrete can be used.
Now you know how to make paving slabs at home. Good luck!
- Homemade tiles from Kostya9
- Homemade vibrating table and homemade tiles from Commander
Homemade tiles from Kostya9
Kostya9 Member of FORUMHOUSE
To implement the idea, specialized network resources were studied on the topic of forms and the portal forum, on the topic of the process itself - the necessary equipment, raw material base, production technology. As it turned out, plastic and other forms are available, whatever you want, the main materials are left over from the construction site, and the existing units require a relatively simple, feasible refinement. Unforeseen complications arose only with the purchase of the five hundredth cement - due to the low demand from local merchants, it simply was not there, so I had to go to a neighboring town.
Manufacturing
To make the tile as strong as possible, a circular saw was remade under the vibrating table - the working surface was replaced by a heavy plate (with springs from nine racks), and a vibration motor under the plate. A typical concrete mixer for mortar preparation, ready-made polymer molds, with an imitation of the surface of sandstone, for drying - an old refrigerator, placed sideways.
The ratio of the proportions of concrete was also selected on the forum.

In addition to the existing screenings, washed river sand and purchased cement of the desired brand, a plasticizer was required for the tiles, the choice fell on SP-1. This is a universal additive that improves the characteristics of the mortar, its use increases the mechanical strength of concrete, reduces the number of pores on the surface, gives smoothness and increases the vibrating efficiency. Although it was dreaming of colored tiles, the cost of dye and white cement, in order to obtain a rich color, made it necessary to make do with a natural, gray tint.
The batch proportions are as follows:
- Screenings (crushed stone fraction 0-5) - 38 kg (three ten-liter buckets);
- Sand (river, washed) - 18 kg (one ten-liter bucket);
- Cement (M-500) - 17 kg (fourteen liter bucket);
- Plasticizer - 80 grams per batch (diluted with a liter of warm water);
- Water - 8.5 liters (if the weather is hot, another 0.7 liters).

Mixing technology:
- Screenings (all) are put into the concrete mixer first;
- Water pours in;
- Added plasticizer;
- The mixture is thoroughly mixed;
- Added cement;
- Thorough mixing again;
- Added sand;
- Last mixing (if necessary, water is added).
The consistency of the solution is quite thick, reminiscent of wet earth - this is a conscious choice, although many prefer to work with more fluid solutions.
Kostya9
Liquid concrete that liquid mud– no strength.
Forms previously lubricated with engine oil (in the corners, with a brush) are placed on a vibrating table. Filling with a solution should be uniform.


Processing time - from three to seven minutes. Vibration should not only compact the mixture, but also expel air bubbles from it. In the process of processing, the forms are interchanged and rotated around their axis - so that the impact is uniform. As it shrinks, the mortar is added until the mold is completely filled, you can slam it with your hand to ensure that there are no voids left. From the vibrating table, the forms are sent for more than a day (25-30 hours) to the dryer. On the advice of the participants in the branch, the old refrigerator, also known as a drying chamber, was turned from its side, onto its "back", which greatly simplified the process of laying and removing the product.


After this period, the finished tile easily comes out of the mold due to lubrication, and thanks to ongoing hydration processes that keep the raw material hot. If you overexpose the tile and it cools down, it will be more difficult to get it out of the plastic - you will have to pour boiling water over it so that the plastic expands. However, if you overdo it not for a couple of hours, but for a couple of days, and it has time to completely cool down, it will be difficult to take it out, even using boiling water.

Having stuffed his hand on a square tile, the craftsman moved on to figured tiles and decided to use chromium oxide as a dye.


The first test of adding the dye according to the norm, at the rate of 1% of the binder (170 grams per batch), practically did not give a result. It was not a color that appeared, but a light, almost imperceptible shade, so the dosage was doubled, which gave the desired green. Like a plasticizer, the dye was previously diluted in water.

Homemade tiles from Commander

Commander Member of FORUMHOUSE
He covered both the barn and the yard with tiles of his own manufacture, paths to the greenhouses too. Very good and beneficial!
And in this case, a homemade vibrating table was used. Here's the "recipe" for anyone interested:
- Motor - from a washing machine (on rubber shock absorbers);
- From her - a pulley for a belt drive from the engine to the eccentric;
- Eccentric - the former rotor of the electric motor: cut off by a grinder 1/3, a cage for bearings is machined, holders are welded, the whole structure is screwed to an iron sheet;
- On top of the sheet / table - wooden flooring 60x60 cm (for tiles 50x50 cm);
- High sides - so that you can make tiles 6 cm thick.


For household purposes - paths to the barn, in the garage, along the edges, the Commander makes large, square tiles measuring 50x50 cm, and for decorative paths resembling sidewalks - figured. The forms, as in the first version, are polymeric, soft - unlike hard plastic ones, they do not break for several years.
The composition of the solution and the proportions for batching:
- Gravel - a bucket;
- Cement - a bucket;
- Screening - 3 buckets;
- Plasticizer - 2/3 cup;
- Water.
Water is poured into a working mixer, a plasticizer is added, gravel is next, after gravel is wetted, cement is added. When the mixture becomes homogeneous, screenings are added. The commander does not add sand, as there is a large amount of dust in the screening, which replaces it and prevents the formation of voids. Forms before use are lubricated with palm oil, as they become dirty, they are easily washed with Karcher. But they become contaminated if the technology is violated and the tiles do not withstand the prescribed day, so it is better not to rush.
The production of paving slabs at home does not bring any special advantages to the developer. Without a vibrating table, the quality of curly paving elements (FEM) is sharply reduced. You will have to buy or make a lot of tile molds with your own hands or dry and accumulate the finished product yourself for several months to paving one path or parking lot. It is difficult to comply with the composition of concrete, and you will also need a place to store paving stones. But if you are not afraid of difficulties, then welcome.
Independent production of paving stones resembles a miniature erection of a foundation slab into a formwork. Filling can be done in forms created by oneself or purchased in a store.
The easiest way to make the form yourself is from a bar:

Similarly, a Rhombus, Square, Hexagon is created. Factory forms simplify the technology, they are made of several materials:

After calculating how much lining is needed for the track, you can buy the right amount of propylene or rubber molds. You can make your own molds from silicone, polyurethane or two-component polymer resin, having at least one factory paving slab for a sample (master model):
- the composition is mixed in the right amount;
- the master model is placed in a bounding container (for example, knocked down from 4 boards with a bottom);
- a silicone solution (polyurethane or resin) is poured into a container.
Look more clearly in the video:
You just need to change the brick to factory-made paving slabs.
After drying, the form is suitable for pouring several hundred tiles.
Making a vibrating table is much more difficult:
- an eccentric is attached to the motor shaft;
- the drive is fixed on a table with a metal cover;
- mains operated, installed on a solid base, preferably outdoors.
Under normal conditions, concrete dries from 3 days, and molds are needed for in-line production of FEM elements. Therefore, an analogue of concrete steaming technology is used - immersion for several minutes in hot water (within 80 degrees).
Important! It is impossible to dry the tiles in this way, but the speed and quality of hydration (the formation of cement stone) can be dramatically increased.
Mixing concrete
Having decided according to the layout scheme how many whole elements and halves to make, you can calculate the approximate amount of raw materials, taking into account the following factors:

With small volumes, batches can be made with your own hands with a drill with a mixer equipment. If you need a lot of tiles, a concrete mixer and several vibrating tables are used.
Important! Granite or marble screenings, crushed stone in the sand will significantly increase the strength and frost resistance of the tile. If it is planned to produce paving elements with an ornament on the front, it is better to use seeded sand without coarse filler fractions.
Instead of a plasticizer, concentrated detergents (for example, Fairy) are often used in a proportion of 1 tablespoon per bucket of solution. But it is better to use industrial plasticizers, such as C3, sold both in dry and liquid form.
Laying in forms
With known proportions of the components of the mixture, the technology for manufacturing curly FEM paving elements with your own hands is not difficult:

This time is sufficient to remove air from the concrete, uniform distribution of the large fraction of the filler throughout the volume. The vibrating table is turned off after the appearance of cement milk at the surface, the disappearance of crushed stone inside and the cessation of the release of bubbles.
For each tile, you need to dry it, and then use the mold to make the rest of the paving stones. Therefore, an accelerated formwork stripping technology is used - after the concrete has set, the FEM in the mold is immersed in 80 degree water for 5 - 7 minutes to accelerate the curing of the composition.

In hot water, it is easier to get the tiles out of the mold.
The technique replaces steaming, allows you to reduce the hardening time to 1 - 2 days, after which, the paving stones are powerfully laid. On the very first day of FEM production, you can estimate how much paving stones can be made per unit of time.
Advice! To reduce the complexity of the technology, the molds are rinsed with saline - brine. The proportions for its preparation are 30g / 1l (salt, water, respectively).
Colored paving slabs
To reduce the budget for finishing, only a certain part of the tile can be colored. Therefore, before preparing concrete with your own hands, you should calculate how many “halves” and solid paving elements you need to do with your own hands. The pigment is added to the cement-sand mixture during mixing, the main nuances of the technology are:

In addition to increasing the cost of the product, the manufacturing technology does not add any difficulties. The paving slab dries in the same way, the strength and moisture resistance do not change. Experts recommend making rigid concrete with the lowest possible W / C ratio of 0.4 - 0.6 units.
Important! When creating high-quality colored paving slabs, only white cement is used. Conventional gray Portland compounds are not intended for tinting, react with pigment, and can give a "dirty" color.
The economic effect is achieved due to a special technique for the manufacture of two-layer paving stones:
- separately from gray, but at the same time you need to make colored concrete;
- forms are filled with a tinted mixture 1.5 - 2 cm in height;
- kept on the included vibrating table for 20 seconds;
- then the gray concrete of the base layer is poured on top;
- the tile is vibrocompacted for another 20 seconds;
- wrapped together with the form in polyethylene;
- removed for drying for 2 days.

Double layer vibrocasting.
During the specified time, two layers of concrete do not have time to mix completely, but they penetrate each other, becoming a single layer. The front surface receives high-quality coloring, the pigment is saved. You can calculate how much gray and colored concrete is needed empirically.
Luminous paving slabs
Luminous paving slabs are used to improve the quality of sidewalk exteriors. There are elements of paving LED network and rechargeable, luminescent. In all these cases, it is possible to manufacture glowing FEMs with your own hands:
- luminescent paving stones are obtained after staining with a special composition;
- LED lamps with a controller board are placed inside a transparent box of a suitable size or glass block.

Glowing pavement.
Luminous paving stones with LEDs can be made on solar panels or from a 220 V network with a power supply. The specific figure, how much to make luminous paving slabs for the path, depends on the owner of the project.
borders
The necessary spatial rigidity of the “trough”, in which the paving elements are laid, is provided by the curbs installed on the mortar. Making them on your own will help reduce the budget for landscaping. Forms can be bought or designed independently from materials:
- polymer resin - the factory border, which is a matrix, is completely recessed into the diluted mixture;
- lumber - edged or tongue-and-groove board with side jumpers;
- rolled metal - a channel of a suitable section with muffled ends.

Factory molds for the border.
After lubricating the internal surfaces of the form with a soapy solution, used oil, you can fill it with a concrete mixture and make borders according to the technology:
- concrete compaction - baying with a reinforcing bar or laying the form on a vibrating table;
- drying - after demoulding, the finished products are stored with an air gap.
Depending on the air temperature (+5 - + 30 degrees), curbs can be mounted at the place of operation for 4 - 28 days, respectively.
Stormwater trays are built using a similar technology with minor additions:
- the shape is a little deeper;
- a piece of pipe is longitudinally fixed at its bottom, due to which a recess is created.

Without these additional elements, it is impossible to provide a drain in a given direction, the water will destroy the soil adjacent to the sidewalks.
Large-format paving slabs poured in place
The technology of curly paving elements poured in place is placed in a separate category. The form for this paving slab is very large, it is inconvenient to transport finished products. Therefore, they are cast at the place of operation close to each other. The seams are provided by the mold material.
The industry produces molds made of propylene 44 x 44 cm with a slightly modified configuration and name (Mosaic, Garden Road). The declared reversibility of 1000 cycles is almost always observed.

An analogue can be made on its own from a steel corner and a strip according to a propylene sample. In any case, the technology differs from classical paving:
- the form is set in place;
- filled with concrete
- partially bayoneted with fittings or trowel;
- after the start of hardening, the form is removed, mounted close to the previous paving slab.

Such a coating has high adhesion to the underlying layer, but has a large format. In the middle part, the recesses are not through, but only imitate seams. Therefore, they may accumulate moisture and partial destruction of the material when water freezes in winter.
Thus, curly paving elements can be made independently, knowing the composition, and how many tiles of different colors will be needed in total.
Advice! If you need repairmen, there is a very convenient service for their selection. Just send in the form below a detailed description of the work to be done and you will receive offers with prices from construction teams and firms by mail. You can see reviews of each of them and photos with examples of work. It's FREE and there's no obligation.