Home decoration is one of the techniques for creating an unforgettable and cozy atmosphere. Application is in demand. You can make stencils for decor with your own hands. Templates can be found online. Such images are simple and concise, they are suitable for decorating walls, mirrors and even windows. A variety of templates allow you to highlight one zone and do not overload the space. A properly selected pattern or pattern will emphasize the overall design of the home and create a special atmosphere.
Using this technique, you can make a unique and stylish decor.
Read in the article
DIY decor stencils: templates and photos
The selection of stencils for wall decor is determined by the design features of the room; interesting ornaments are created with their own hands.
Take note:

- caution in using a large number of elements; conciseness is recommended for decorating walls;
- in one room there should be one type of ornament, you should not combine different types patterns. Geometric ornaments are not combined with;
- it is not recommended to use too small details that look like spots on the wall.
The more lines and jumpers on the template, the clearer and more beautiful the picture will be. Are used the following types forms:
- monophonic is made of paint. Differs in simplicity;

- multicolor pattern performed with a large number of shades. For such a decor, many forms are required;
- volumetric stencils are made using putty, they have a thickness of 2-3.5 mm;

- the reverse template or anti-stencil is characterized by the coloring of the surface not inside the sample, but outside it.
Useful information! From different drawings, you can create interesting plot combinations. For example, butterflies are wonderfully combined with dragonflies, birds and flowers.
Paper is considered the most available material for all kinds of stencils. It is easy to attach to the wall and cut out any elements from it. Cardboard is even more durable material. It is difficult to cut curves on it, but patterns from it can be used several times. made of vinyl or polyethylene.
What are stencil drawings?
Do-it-yourself decor stencils are templates that are made on durable cardboard or at metal sheet. Pattern elements are distributed on the surface of the material, and then the marked parts are cut out and form holes. In the future, these areas will be painted in.
Stencils can be multi-layer and single-layer. The latter are performed in one overlay of the template. Layered options are often used in street art. Used for coloring different types paints: acrylic, enamel and water-based.


Comment
Design studio "Uyutny Dom"
Ask a QuestionScreen printing technique
The basis of stencils for wall painting are graphic patterns with clear boundaries. Templates are worth buying or doing them yourself. It is important to choose matching jewelry and for .

With the help of templates, figured ornaments and entire thematic pictures are created. Stencils come in different sizes and materials: vinyl, paper, or even plastic. For independent work lavsan film is required. It is placed on a glass surface, under which the lamp is placed. Then a template is made from the film.

Cutting is performed from the middle part of the picture and from small parts. If a large ornament is applied, then the template is made in parts. Separate sections are mounted to the wall.

It is better for beginners to use self-adhesive products, and experts use glueless options, on the inside of which the adhesive composition is distributed.
Application consists of several stages:
| Image | Stages |
 | Stencil preparation. All unnecessary elements are cut out. |
 | The layout is attached with adhesive tape. |
 | On the open areas the paint of the selected shade is distributed. |
 | After drying, the stencil is carefully removed from the working surface. |
When distributing the coloring solution, it must be taken in small quantities so that smudges do not form on the walls. If the pattern consists of several types of paint, then before each application of another paint, you must wait until the applied layer dries. Poorly colored areas are corrected with a thin brush.

Related article:
How to create unique design in a room for any purpose, how to choose the right template, where to place the picture? Ready-made stencil templates for butterflies, flowers and other ornaments. About this and much more - in our material.
When choosing original stencils for wall decor, you can download free templates in this review.
Beginners can use the following tips:
- the brush is held perpendicular to the working surface;
- so that the villi do not fall on the painted area, the coloring is done in a circular motion;
- large stencils are painted over with a paint roller;
- paint is collected in small quantities, and the excess is removed with foam rubber or a soft cloth;
- used samples are washed warm water;
- after the paint has dried, the ornaments are varnished.
Often printed patterns are used for stencils, which are used in original form or scaled up to suitable sizes. Finished Image transferred to film material or special paper, and then cut along the lines.
Useful advice! Borders are used to highlight the corners of the room.
Making flower stencils for do-it-yourself decor: templates
For creating stylish option drawings are used to decorate the walls. Application of templates with compositions of various colors suitable for those who wants to change the design of the situation.

With flowers, stencils for decorating furniture are selected. This is true for Provence style furnishings. Floral ornaments are suitable for any room. Picturesque daisies, roses, tulips and poppies will diversify and add individuality to the room.
Useful advice! Volumetric decorations look stylish. To perform a spectacular image, it is worth picking up acrylic paints of various tones.
Depending on the technology, certain stencils are selected. The direct version is a sample, with floral ornaments. Botanical motifs can be made more natural or given an abstract look. Flowers are suitable for any room.


Features of cat stencils for DIY decor: templates and ideas
There are many non-traditional ideas for creating children's decor stencils, such as drawings with cats and other animals. Similar figures can be depicted on the walls or on furniture. Animal silhouettes or their faces are used. Such pictures are suitable for, boudoir, children's or bathroom. Alternatively, tiger stripes or leopard spots are used as decor.


Advantages of butterfly stencils for DIY decor: templates
You need to decide on the form of the application. You can transfer the silhouettes of the most unusual butterflies. If you can’t draw yourself, then you should find ready-made examples with butterflies to be printed. In some cases, ready-made stickers with butterflies are used.

The nuances of making geometric patterns
You can use unusual stencils for decor with your own hands. Patterns of geometric shapes allow you to create a unique and individual environment.

The patterned wall looks original, it does not have to cover the entire wall. A repeating stencil is used to create a pattern in oriental style Samarkand. Relevant geo-motives.
Geometric patterns are perfect for decorating an Art Deco room. A magnificent example of geometric patterns are Byzantine or Greek ornaments. simple lines intertwined in complex and look very intricate. Drawings with straight lines are easier to cut.

Options for borders
Stencils are used to decorate borders. They consist of a repeating pattern and the pattern is used multiple times. For borders, images of flowers, butterflies, leaves and simple ornaments are suitable. Such images are concise.

Before using the stencil, the wall surface must be carefully prepared. It should be free from dirt and dust.
- a level is used to perform markup;
- before staining, it is recommended to practice on whatman paper or a piece. Such a sample will help you choose a color for the ornament;
- spray adhesive is used to fix the stencil. It does not stain materials. Adhesive composition distributed over the surface and creates excellent adhesion of the stencil to the wall;
- it is better to use acrylic solutions. They dry quickly and are recommended for any surfaces;
- if a sponge is used for staining, then first prints are made on a piece of paper to remove excess paint;
- it is important to ensure that the paint spreads smoothly in small elements and corners;
- to make a three-dimensional drawing, acrylic putty is used, it is distributed with a spatula. If the layer is not smooth, then a fine sandpaper is used for leveling.

by the most common mistakes when working with a stencil, there is ink leakage and sample displacement. To avoid such problems, you need to take a small amount of paint each time and fix the stencil more firmly.
Learning stencil making techniques and detailed instructions will help to get a luxurious and high-quality decoration of the room.
Advantages and disadvantages of do-it-yourself stencils
The widespread use of stencils is due to their special advantages:
- using one type of pattern, you can create a whole composition on the wall;
- combinations of shades are applied;
- ease of use and availability of a large number of pattern options;
- non-standard decoration of walls and furniture;
- templates are used for any surfaces, regardless of the structure and texture;
- with the help of samples for painting, a small redecorating, since facing the wall with ornaments greatly changes the appearance of the room.

Templates are used not only for decorating, but also for creating a variety of postcards, collages and posters. A stencil is necessary for a variety of decorative works. It helps create original space, volume and depth, and also serves as an inspiration for creativity. it budget way bring something beautiful to your home without spending money.
Did you like the post? Support us and share with your friends
Decorating your home is one of the ways to give the room individual style and unique image. There are many ways to achieve this, but wall decor using stencils is gaining popularity due to their affordability and ease of use. Such an ornament highlights one zone without overloading the entire space. A well-chosen pattern will emphasize the style of the room, emphasize where necessary, and create a special mood. The article will discuss how to make a stencil for wall decor with your own hands and how to work with it correctly.
The stencil ornament is universal. It can be applied not only to walls, but also safely used for floors, fireplaces or windows. Everything is limited solely by the imagination of the owner of the premises.
Types of stencils
plain. The most common type, one tone of paint is taken and applied to the wall. Simple, fast, beautiful.

Multicolor. Creating a real pattern, with many shades. This type requires a certain skill and patience, since many stencils need to be made and the surface painted, laying one on top of the other. It is important not to get confused here.

Volumetric stencils for wall decor. The stencil is applied using putty, 1-3 mm thick. Despite the ease of application, it looks very beautiful and unusual, giving the impression of a velvety surface.

Anti-stencil or reverse stencil. It is called so because the surface is not painted inside the stencil, but outside it, creating a backlight effect. Perfect option for muted bedroom colors.

Stencil selection
Of course, the stencil should be selected based on general style the room in which the ornament is created. Since they don’t argue about tastes, it’s a thankless task to advise the choice of one or another stencil. However, it is worth giving a few general recommendations.
- Accuracy to a large number details. A beautiful painting on the wall can turn into a kind of graffiti if you get too carried away with decorating the room. Conciseness is a trend that is always in fashion.
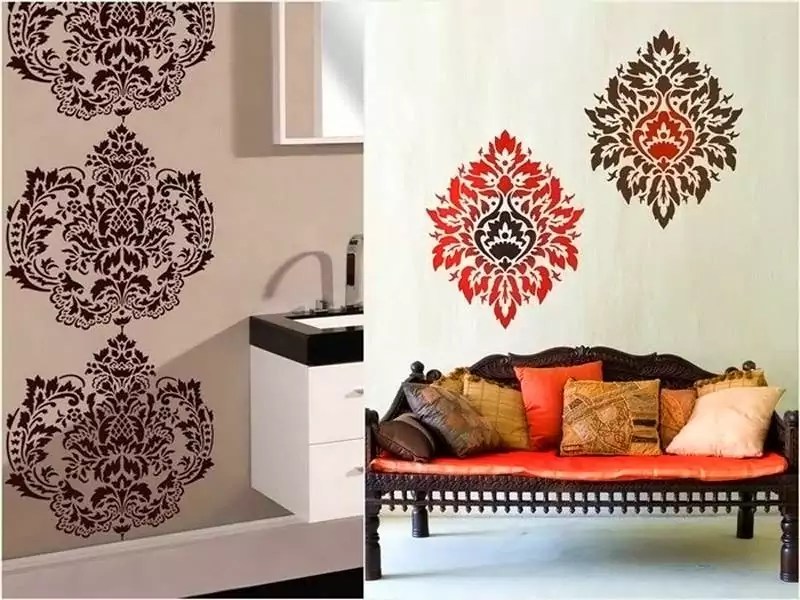
- One room - one type of ornament. Butterflies do not go well with geometric patterns, and damask ornament loses its charm surrounded by trees and flowers.
- No overly small details. Firstly, they are difficult to paint over, and secondly, from a distance they can look sloppy, just like paint stains.
- The more jumpers and lines in the stencil, the more beautiful and clearer the picture will be after application.

Sample stencils for wall decor


Choosing a place for a stencil
As in the case of the choice of the very type of pattern or ornament, it is impossible to give clear recommendations, that the stencil will be appropriate in one corner and inappropriate in another. Only a sense of beauty will tell you where it is better to place the pattern.
To begin with, you can make small stencils for wall decor, and decorate the places next to the switches with an ornament. Usually the patterns around the mirrors, above the table or near the bedside tables fit well into the design of the room.

How to make a stencil with your own hands
The market abounds huge amount ready-made stencils for wall decor, for every taste and budget. Almost every hardware store, especially large chains retail building materials, offer a wide range of ornaments and drawings. But the more valuable will be a drawing created by oneself.
To make your own stencil, you will need the following tools:
- original drawing;
- stencil material (film, plastic, cardboard);
- stationery knife;
- marker, pencil;
- scotch;
- a glass (or other) surface on which it is convenient to cut a stencil.

First of all, it is necessary to decide on the pattern according to which the stencil will be made. Those who have artistic abilities can design and draw it themselves. Those who are not lucky enough to have a talent for drawing, having figured out in what style they would like to decorate the walls or ceiling, can search for a suitable image on the Internet and print it out on a printer. If the pattern is large, divide it into parts, and then fasten the parts together with adhesive tape.
The next step is to choose the material for the stencil. It can be plain paper or cardboard, self-adhesive film or thin plastic, depending on the type and size of the ornament. To simplify the task, you can contact any advertising agency, where they will help you create a stencil from the image and print it.
To transfer the ornament to the material, you need to use carbon paper, or, if used for a stencil transparent plastic, just circle it around the outline with a marker. To prevent the drawing from “leaving”, it is attached to the stencil with tape or paper clips.

When the drawing is transferred, in some cases it is required to complete it by drawing the lines and jumpers along which it is cut. If the stencil is depicted on paper or cardboard, then it is better to paste over it with adhesive tape on both sides or laminate it so that the paint does not absorb and the jumpers do not twist. This will extend the life of the stencil.

It is important to cut the stencil in such a way that cuts and burrs do not form, otherwise the final drawing will look untidy. Another subtlety - all small details must be attached to larger ones, otherwise they will disappear when cut. Only the areas to be painted are cut out. For this, a clerical knife or blade is used, and glass (or any other solid material, which is not a pity to cut), then the cut lines will be more clear and even.
Working with a stencil
Required tools:
- stencil;
- screen glue;
- brush, roller or sponge for applying paint;
- acrylic or spray paint.
First of all, it is necessary to prepare the surface on which the stencil will be applied. Clean it from dust and dirt, if you can wash it, if not, wipe it with a clean dry cloth or vacuum it.
The second step is marking. If possible, it is better to use a level, with it there will be confidence that the drawing will not be skewed or crooked. The extreme points for the stencil are marked with a pencil in order to attach it evenly in the future.
It is recommended that you first practice before responsible drawing a picture on the wall. This can be done on a piece of wallpaper or a large drawing paper. A preliminary sample will allow you to practice the application technique and choose the color of the ornament. It is advisable to make several options different shades, and try on how each of them will look in the future, attaching the resulting pattern to the wall.
Also, ready-made reusable stencils for wall decor are on sale. They are made of a polymer film that is easy to clean and does not tear, allowing you to train on paper. required amount once.
Aerosol adhesive
In order to fix the stencil on the wall, it is best to use a special spray adhesive. It leaves absolutely no traces, and when using it, you can not be afraid that wallpaper or paint will come off the wall along with the stencil. The glue is sprayed in an even layer onto the stencil, which is then carefully pressed against the surface, especially in places of thin bridges.

What is important to know about working with glue:
- on the different surfaces it holds the stencil differently than more Smooth surface, the better the adhesive properties of the adhesive;
- after removing the stencil, the glue does not remain on the wall;
- glue is applied to the stencil, and provides maximum adhesion with it;
- after washing the stencil, the glue can retain adhesive properties, so if reuse is planned, then the glue can not be completely washed off;
- the larger and heavier the stencil, the more difficult it is to keep it only on glue, in such cases you may need a "safety net" in the form of masking tape;
- it does not prevent paint from flowing under the stencil.
Coloring
Coloring is an activity that does not tolerate fuss.
For stencils, it is recommended to use acrylic paint, it dries quickly and is suitable for all types of surfaces. The paint is applied with a brush, sponge or roller. Important, when working with a stencil, the paint should be minimal amount to eliminate the possibility of leakage.
When working with a brush, it is held directly perpendicular to the wall, the paint is applied by stuffing, to prevent lint or paint from getting behind the stencil.

If staining is done with a sponge, then the first prints are best done on another sheet of paper, this will allow you to remove excess paint.
When working with a roller, it is necessary to ensure that the paint is evenly distributed, especially in the corners and small details stencil. It is more convenient for them to work with large stencils.

To spray aerosol paint, the can should be held at a distance of about 30 cm from the wall. It is possible that the surface will have to be additionally protected from accidentally getting paint outside the stencil.
Saturation of the picture with color occurs gradually, in several passes. If its boundaries are not clear enough, they are drawn with a thin brush after removing the stencil.
Creating a three-dimensional drawing
To apply a three-dimensional pattern, you will need a special acrylic putty. It is applied with a spatula, gently layer by layer, until it reaches desired thickness. Volumetric drawing is usually achieved with a thickness of 1-3 mm. A couple of minutes after application, when the putty has already set, but has not completely hardened yet, the stencil must be carefully removed so as not to damage the ornament. If the layer turned out to be not very even - it's okay, after complete drying putty it is easy to level with a fine sandpaper. Then the drawing can be colored or toned.

When the work is completed, the stencil must be washed and dried, if possible, for reuse.
Avoidable Mistakes
The most common mistakes that happen when working with a stencil are:
- stencil offset;
- paint leakage.
To avoid such troubles, you need to securely fasten the stencil, spray glue is the perfect assistant here. And also to collect the minimum amount of paint. Accuracy and patience will undoubtedly help to achieve the perfect result.
Practice shows that those who have studied the stencil manufacturing technology and carefully read the instructions for use and coloring are always satisfied with the result.
Stencils for wall decor photo


Stencils for decorating kitchen walls

We will send the material to you by e-mail
A real exclusive and a flight of fancy appears where do-it-yourself stencils for decor are used, the patterns of which can be thought up or peeped in our review. Tdecorators call pattern drawing a special style of painting, they are concise and simple, appropriate on walls, windows, mirrors and household items. There is an erroneous opinion that working with stencils is much easier than painting directly, but in reality this is not so. It requires extreme accuracy, manual dexterity and excellent taste. At the end of the article you can download good selection stencils and choose the one you like.
Stencils on the wall in the bedroom
Stencil drawings - what is it?
A stencil is a drawing template that is made on thick paper, cardboard or film, sometimes on a sheet of metal. Fragments of the pattern are first applied to the material, then the designated parts are cut out, forming through holes. Subsequently, it is these areas that will be painted over with a contrasting color, while the rest of the area will turn out to be unpainted.


Cats are so loved that you want to capture their graceful figures even on the walls and. Using stencils, you can reproduce the silhouettes of these funny animals or their cute faces. The image of a cat is a stylish accent that requires an appropriate entourage. Best of all, such pictures look in, boudoir, in, bathroom or nursery, that is, in personal space.

A variant of the "cat" theme are leopard spots or tiger stripes, which can be successfully reproduced using stencils.


Geometric stencils by template
Fine examples of geometric designs are classical Greek and Byzantine ornaments. Simple lines are woven into false patterns that look both austere and intricate. If the drawing consists mainly of straight lines, then this will greatly simplify the cutting process.


Source: www.cuttingedgestencils.com
Butterfly patterns
Stencils in the form of borders are convenient because they contain a repeating pattern, that is, by cutting out the template once, it can be used several times. For borders, it would be appropriate to make stencils for decor with your own hands, butterfly patterns, flowers, leaves, simple ornaments. Border drawing should be concise.


Source: www.cuttingedgestencils.com
Exclusive DIY Templates
The basis of the stencil is a drawing, which must be graphic, that is, have clear boundaries.

You can use the printed drawing as it is or scale it to the desired size. Every person in lower grades school used a palette in a math lesson, it can be used as a scaling tool. To do this, on a printed drawing with a simple pencil a grid of 1 by 1 centimeter is applied. A grid with the same number of cells is applied to another larger sheet, but their sides can be of any arbitrary size. For example, if the image needs to be doubled, the grid is made with a cell side of 2 cm. On the resulting grid, fragments of the picture are transferred cell by cell. This method is quite fast and very entertaining.

After receiving the finished drawing, it must be transferred to a piece thick paper or film, and then cut along the marked lines. You need to cut with a sharp clerical knife, and you will have to update the blade often, then the line boundaries will be smoother. Do not try to cut the perfect stencil. Firstly, it is impossible to do it manually, and secondly, the drawing with slight flaws looks very nice and resembles a real “hand made”.

Expert point of view
Yaroslav Galaiko
Lead Designer and Head of Ecologica Interiors Studio
Ask a Question“In some cases, you can use a special metal pattern that you can buy in the stationery department or in sewing stores. This simple device will allow you to accurately cut along curved lines different configuration."
In most cases, the process of applying a stencil to a wall looks like this:
| Image | Stages |
|---|---|
 | The desired stencil is cut out, all unnecessary elements are removed. Work is best done on a large hard surface. |
 | The finished layout is attached to the wall with adhesive tape. If decoration is done on wallpaper, then regular tape can not be used, so as not to damage the surface. |
 | The paint is applied with a roller on the surface of the stencil. Be sure to make sure that the layout fits snugly over the entire surface, otherwise ugly smudges may form in place of the patterns. |
 | After the paint has dried, the stencil is carefully removed from the wall. |
Creation of three-dimensional compositions
A more difficult technique for decorating is the creation of three-dimensional compositions. Here it is not just, but the use of gypsum and plaster mixtures. The embossed surface looks very creative and exclusive, but it will also require some skills and patience.

The process of manufacturing a volumetric composition can be divided into several stages:
| Image | Description of the stage of work |
|---|---|
 | After choosing a pattern, you need to prepare a stencil template. To create a bas-relief, you will need thick cardboard with a thickness of at least 3 mm. The stencil is attached to the wall with self-tapping screws. The prepared mixture is applied with a spatula. |
 | After the mortar hardens and the stencil is removed, we “build up” the bas-relief to the desired thickness with the help of small curly spatulas, which you can buy at any building hypermarket. |
 | The next step is to round the surface of the bas-relief with sandpaper and grind the entire pattern. |
 | At the last stage, we paint the finished relief. At the same time, it will not be superfluous to protect the walls with the help of our own stencil, thereby leaving only those areas that need to be painted. |
Examples of decorating furniture and mirrors
Highly an exciting activity is a decoration with stencil drawings of furniture and mirrors. The drawing itself can be applied to any surface, be it wood, concrete and brick, or fabric and glass. When decorating mirrors, it is best to use self-adhesive paper stencils. In this case, it is enough to simply remove unnecessary fragments and stick the pattern on the surface of the mirror. Most often, the corners of the mirror are decorated, or its entire perimeter.


For furniture decoration, the choice of technologies and options is almost unlimited. With certain skills and patience, you can create real works of art.


Painted walls are becoming more and more popular. But sometimes you want to dilute their monotony with something. Easiest, fastest, cheapest and spectacular way- use stencils for walls for painting. The drawing is graphic, clear and bright. Such objects can fit into any environment. But the best part is that the work takes from several minutes to several hours.
What are they made of
Stencils for wall decor for painting are divided into reusable and disposable. Various materials are used depending on the purpose. Disposable, mostly paper. From thick white or colored paper. Reusable stencils for walls for painting are:
A few words about vinyl stencils for painting walls. They can be in the form of sheets or rolls. If you are going to cover a large wall surface with one pattern, it is advisable to take several identical patterns. They can be attached to each other. So the work progresses faster - a large area is processed at a time.
Varieties of stencils
Stencils for walls for painting are different not only in the material from which they are made. They differ in the type of drawing:
- Simple or single. The entire drawing is painted in one color. If desired, you can make a gradient - from a darker shade to a lighter one. But that's all. Parts of other colors are not provided.

- Combined or multicolor. This is a whole series of patterns, each of which is painted over with paint of a different color. In order for the details of the picture to match, marks are applied to them. When the stencil is placed on the wall, these marks are combined.

For this picture, two stencils were boring - for black and red
- Reverse or anti-stencil. This template is cut to reverse principle, that is, what is cut out in ordinary patterns remains in this and it is these parts that are attached to the wall. Then the paint is applied, but it paints the areas not covered by the stencil. It turns out around him a halo of a different paint, and the drawing itself remains the base color.

- For three-dimensional drawings. Now there are decorative plasters and putties on sale. They can also be used for painting on walls. Stencils for them are made special - thick, made of polyvinyl with a thickness of up to 4 mm. When drawing a picture, the slots are filled with putty, remain until dry. It turns out a three-dimensional drawing.

The easiest way to work with simple templates To start, you can try this type of pattern. If you are confident in your abilities, you can work with more complex combined ones. When working with them, remember that you can remove the film only after the paint has dried.
Where to get templates
Available for sale ready-made templates for decorating walls. They are all made from vinyl film as it is flexible, durable and lightweight. If you don't like the ready-made templates, there are two options:
- Order production in an outdoor advertising or booklet printing campaign (often these are the same campaign). They have special equipment - plotters, which cut out the necessary outlines on vinyl. Moreover, some of them can develop a stencil for you from a photograph.
 beautiful birds and animals - that's another win-win option
  Stencil of dancing cranes - according to popular beliefs, happiness
 - Do it yourself. If you have artistic ability, it is likely that you can draw the pattern yourself. If not, download the version you like, enlarge it to the required size and print it out. Take a thick (not packaging) cardboard, put a carbon paper, on top - a drawing. Everything needs to be well fixed so that it does not move. Outlining the drawing, transfer its contours to cardboard. Then sharp knife cut out. To make cutting easier, put something soft under the cardboard (a piece of felt, for example). So the edges will be smoother. In general, when self-manufacturing you have to be careful - every burr or unevenness spoils the overall impression.
 Stencils for walls for painting: cats - a win-win option These are more difficult to make - more subtle details
Independent production of stencils is a painstaking task. If that doesn't scare you, you can go for it. You can try to work with film. It requires a very thin and sharp, but inflexible blade. If there are even small defects - a burr, uneven edges - everything must be corrected. In general, good luck to you.
How to work with stencils
You can apply a picture not only on painted walls, but also on wallpaper, plastic, glass, etc. That is, stencils for walls for painting can be used not only for decorating walls, but also for decoration. furniture facades, for example. Unless strongly embossed surfaces are suitable. You can’t normally apply paint to them. All others fit. Moreover, it is compatible with almost all acrylic paint. They can be in a jar or aerosol. Everyone knows the advantages of acrylic: the paint lays well on both smooth and porous surfaces, dries quickly, does not fade for a long time, and has almost no smell. That is why stencils for painting walls are usually painted over with acrylic paints.

What to work
If an anti-stencil is used, then paint is applied only from a cylinder. You can’t achieve such an effect with other tools (except with a spray gun). When spraying paint, the balloon is located 25-35 cm from the surface to be painted. It is better to choose the distance by conducting a “feather test” on a piece of old wallpaper. So you will accurately select the duration of the issuance of paint, and movement, and distance. And one more thing: when working with a spray can, it is necessary to additionally protect the territories adjacent to the stencil - so that an unnecessary part of the wall does not turn out to be painted from careless movement.

It is necessary to work with paint in spray cans carefully - its quantity is difficult to control
When working with all other templates, you can apply:

In any case, we take the paint in limited quantities. If there is a lot of it, it will flow under the stencil, ruining all the work. Therefore, having dipped the brush / foam rubber / roller into the paint, we wring it out well. The amount of paint can be controlled by swiping several times over an unnecessary sheet of paper / piece of wallpaper.
What and how to fix
So that the stencils for walls for painting do not move, they must be fixed on the wall. There is a special glue for this. It is applied thin layer on the reverse side stencil, after which it is attached to the wall. After the work is done, it is not a problem to remove it. Moreover, it does not damage the surface.
There is another option - double-sided masking tape. Note! Definitely masking tape. Unusual. If you use a normal one, it will damage the wall - most likely, a piece of paint will remain on the adhesive tape. Or vice versa, part of the sticky composition will be on the wall. Which is no better. But the masking tape acts approximately like the glue described above: it holds well, and does not leave marks after peeling off.

Scotch tape is easier to buy and cheaper, so most use it. Cut it into small pieces, remove protective film on one side and glue to the stencil. You need pieces in the corners - that's for sure, but they may also be needed in the middle long side sheet or elsewhere. It is important that the stencil is held well and that it is not possible to move it.
The procedure for transferring the picture to the wall
You need to work with a stencil for painting walls like this:

Then, if necessary, repeat the procedure. The next time you need to check if the paint left over from the previous time has dried. Can only be used after complete drying. Having dried several times, the paint forms a crust of solid thickness. This may cause it to flow between the stencil and the wall, or the shape of the pattern will change. Therefore, after several applications, remove the paint.
Features of working with a three-dimensional stencil
To form a three-dimensional image, you can use textured paint, putty, decorative plaster, liquid wallpaper and other similar compositions. In stores you can find special formulations, but they are very expensive. In this part, the choice is yours, all of the above compositions are suitable.
All of the materials listed above have a pasty consistency. There is no point in applying them with a brush or roller. You need a small spatula, preferably plastic, flexible. If not, you can use a piece of any plastic. Even an old plastic card will do.

We take a certain amount of the composition on a spatula, fill the cavities with it, immediately removing the excess with the same card. At this stage, it is necessary to ensure that there are no air cavities left, and the surface filled with plaster / putty is even. If you have ever worked with plaster, there will be no problems. Everything is exactly the same.
After the composition has set, but even before it is completely dry, remove the stencil. In this case, the edges of the pattern are torn, uneven. Don't be upset, it's normal phenomenon. Do nothing, just wait for the final drying. Now we take sandpaper with medium or fine grain (depending on the composition that was used) and grind all the nervousness. In general, everything. Further, if you want, you can paint the resulting ornament, but that's another story.
Choosing a place for a stencil
The drawing looks best on an empty or almost empty wall. Here the choice is not limited. You can choose a stencil that will attract attention to yourself. Such a wall becomes an accent.
If the wall is not too busy - there is a piece of furniture near it, but its large surface is free, pick up a stencil that will make the furniture "play out". There are drawings that play with a sofa or a mirror, turning everything into a single composition.

Tall and narrow stencils near doors and windows fit well. Usually this floral ornaments. When choosing them, be guided by the style of decoration of the room. If the decor is colored, choose the colors that are found in the interior.

The best way to hide is to pay attention
Small drawings that play with sockets and switches look very good. This is one of the decoration techniques - if something cannot be hidden, we will transfer attention to it. In this case, it works great.
Type of stencil for rooms for various purposes
Stencils for walls for painting are selected depending on the type of room. There are universal drawings: geometric, floral ornaments, landscapes. They are suitable for any room, corridor, kitchen, etc. You can find a lot of them in various options. And under strict minimalism, and under chic classics or romantic Provence. Moreover, the matter is often not only in the drawing itself, but also in the selection of paint. The same drawing will look different in black and pink color. And this is worth remembering.

There are stencils for walls to be painted with thematic drawings that are appropriate only in certain rooms. For example, in the kitchen, thematic pictures with food and products are usually used. In nurseries, cartoon characters are often drawn for smaller children, for teenagers - heroes of games or anime.
For bedrooms, they try to find more calm drawings. Even if it men's bedroom. Here you need to relax and the atmosphere should be appropriate.

In other rooms - corridors, living rooms, dining rooms - they select neutral images that people will like. different ages. These are all the same plant motifs or landscapes.
Stencils for walls for painting: photo
The number of possible drawings cannot be counted. Different styles, elements, dimensions. Graphic, fantasy, from cartoons, based on paintings, photos, schematic and realistic images of flowers, insects, animals, trees ... In general, there is everything. You just need to find. Some interesting options collected in this section. Perhaps you will like something.


Stylized animals and cartoon characters - stencils for walls for painting in nurseries

Floral patterns - unobtrusive and calm


Even one sheet is a work of art


Linear or border stencils, elongated compositions - all based on plant motifs

Dragonfly stencils... and if you choose fluorescent paint, the effect will be unexpected

Flowering trees - a symbol of spring and eternity
- an eternal theme ... they are also on stencils

Bamboo, spikelets - different styles, but how beautiful ...

Flowers are another win-win theme for interior decoration.

Simple and promising...
Stencils for wall decor will help you get away from the routine of even the most chic wallpapers, save time and hard-earned money. I am ready to tell you how you can use them to decorate the whole apartment with chic patterns or visually highlight a certain corner. And examples of work performed will clearly confirm my words.
What you need to know about stencil
A stencil is a sheet of plastic with slots that form a certain pattern. Large cutouts are connected by jumpers that hold the parts together. A professional cliché has a mark for precise alignment of sheets when repeating a pattern (dot, sheet edge cut). You can simply circle the corners of the sheet with a simple pencil.

What questions may arise about the stencil:
- What material is it made from?
- How to fix the sheet on the wall?
- What and how to draw?
- Is it possible to make stencils for walls with your own hands?

Which stencil to choose
Classification will help to resolve this issue, depending on which the appropriate option is selected. According to the density of the material, the templates are divided into types:
- Standard;
- Textured or voluminous;
- Adhesive.
Method 1
Standard type is made of mylar (hard material), reusable. Does not sag with paint, but may tear if this paint is vigorously peeled off.

Method 2
Textured or voluminous - this is the same template from Mylar, only 1.5 times thicker. Designed for convex patterns from putty / plaster.

For storage, hard stencils are powdered with talcum powder, straightened between hard sheets, such as plywood.
The general scheme is an instruction for working with a volumetric stencil.
 |
1. Fix volumetric stencil on the wall. |
 |
2. Fill with putty cut fragments. |
 |
3. Remove stencil, gradually bending it. |
Method 3
Glue (in everyday life oracal) is a soft vinyl/PVC adhesive backed film for single use. Convenient for drawing on difficult surfaces.
It is worth considering if adhesive stencils for wall decor are positioned by sellers as reusable. This is impossible in principle - the material is soft, deforms during removal at the end of work and cannot be reused.
Advantages and disadvantages of a rigid stencil:
- Durable, reusable.
- Easy to use - attached, fixed, painted over.
- But not close to uneven surface, so the edges may be smeared, they will have to be painted with a brush.
Advantages and disadvantages of the adhesive template:
- Adheres tightly to difficult surfaces.
- But disposable, because when removed it can stretch.
- Removing the film, you can snip off the monthly freshness of the plaster / paint.
- When stored for a long time, they dry out and crack.
- Passionate at work.
General scheme-instruction for working with oracal.
 |
1. Glue stencil on the wall. |
 |
2. Peel off the backing, lower it down while sticking the stencil film on the wall. |
 |
3.Bottom-up roll up stencil. When rolling out the roll, the substrate is separated, and the film is glued to the wall. |
|
|
4. Take out fragments of the picture. In this case, you can use a clerical knife. |
 |
5. Color in the drawing. |
 |
6. Remove film holding it parallel to the wall. |

Depending on the style and, probably, originality, cliches can be divided into the following types:
- Regular/Standard- patterns are openwork "leaky", which is painted over with the main color.
- Inverse- the stencil is the opposite, here it is not the drawing that is cut out, but the background. The slots in the background are filled with a dark color, and the figures remain the same color as the wall.

Beautiful stencils for decor can be made independently from the most affordable materials:
- x-ray film.
- Cardboard. The surface is sealed with ordinary adhesive tape / linseed oil.
- piece vinyl wallpaper covered with paint.
- Binder covers.
You can draw your fantasy in a graphic editor (Corel Draw) and perform plotter trimming in any advertising agency(price approximately 70 rubles/m2). For self-cutting, a clerical knife is convenient. A dense material is placed under the template so as not to scratch the table.

How to attach the stencil to the wall
Just as a sheet of paper is fixed to the easel, so the template must be fixed to the wall.
Fixing is done in two ways:
- Aerosol adhesive(Marabu Fix-it, Idea, KCR01, Cadence).
- Masking tape.
Often glued stencils on the walls are duplicated with masking tape, because large sheets"Gaining weight" due to adhering paint.

Rules for using glue:
- Irrigate with glue not the wall, but the wrong side of the stencil;
- Observe the setting time of the glue, according to the instructions;
- Do not use on rough/textured walls;
- The wall must be clean from dust;
- For a snug fit, the stencils on the wall can be rolled with a roller through the paper;
- Rinse off the adhesive with warm water or a special remover.

What is masking tape good for?:
- Unlike the usual does not leave sticky residue;
- Easily removed by hand.
What paint to choose and how to apply it
You can draw on concrete, wooden, plastered, drywall walls, as well as on wallpaper for painting. Wallpaper absorbs paint better, so it will take more than on a painted surface. Depending on the type of surface, the appropriate paints are selected:

- Acrylic on water based - for wood, cardboard, wallpaper, concrete.
- latex- concrete, gypsum concrete, plaster.
Construction stores sell paints mainly in standard packages - 1–3 kg each, so it’s better to look in art stores / on specialized sites.

Painting is done in any convenient way:
- Hand brush with short bristles.
- Roller.
- Sponge.
- aeratograph.

Unlike spray paints, which have a wide jet, airbrushes are much more convenient to use, but it also costs money. No need to think about how to make halftones, and no need to cover large area spray walls.

How to draw
The golden rule for stenciling is that the tool must be semi-dry. Having dipped the brush (roller / sponge) in the paint, it must be squeezed out - rolled over a sheet of paper so that it is semi-dry.

The paint is rolled out with a roller, but with a brush / sponge they paint with tapping movements, as if driving in paint, no up and down movements. Hold the brush perpendicular to the wall. To saturate the color, the driving procedure is repeated.

What can be done with a stencil
Stencil drawings can be complex, but even with a single drawing, you can get gorgeous picture. Turn on your imagination - by laying out the drawn elements in different ways, you can get original combinations.

What can be drawn with stencils:
- Imitation of carpet, wallpaper;
- plot picture;

- Beat sockets / switches;

- A picture in a molding frame.

Drawings can be contrasting or pastel, differing from the color of the wall by 1-2 tones. The impression of perspective will be enhanced by using plain paint in light and dark tones. To do this, in one place the cliche is rolled up in a dark color - this will be the foreground, in another place it will be lighter - the second plan.

When decorating rooms, it is advisable to choose a theme that matches the style and functionality of the room - we draw fish in the bathroom, and still life / dishes in the kitchen.

Anything will fit into the living room: a landscape, a pattern, a portrait, and in a nursery, fairy-tale characters, numbers, words are appropriate on the walls.

If the child is small, avoid drawing small details/abstractions. AT best case the baby will not “see” the drawing, at worst, it will become irritable.

Between the stencil and the environment there should be something in common, a link, thanks to which the general mood of the room is formed.
Ways to enter stencil drawing to design:

- Pattern- the drawing on the wall repeats the drawing on moldings, curtains, indoor plants;
- use color, which is repeated on decor elements, pillows, bedspreads;
- Pattern Type- arabesques for the "eastern" room, embossed gilded scrolls for the Empire style.

Summarizing
You can and should not even use stencils for wall decor for the sake of saving money. Firstly, it will be nice to look at your creation, and secondly, the room will acquire individuality. By following a specific drawing technique, high-quality drawings can be obtained.
If you want to make a stencil yourself, the video in this article will help you.